Monday, December 20, 2010

Fancy Oreos

Wow your family and friends by dressing up some White Chocolate Covered Oreos (WCCO). You'll have to excuse my poor quality pictures. I don't have the time to dress them up :)

You need any of the following you want.

Candy melts in desired color (found in craft stores or Wal Mart)
Meringue Powder (found in craft stores or Wal Mart)
Food only paint brush
Decorating sugar or sprinkles


Candy Melt design. Following directions on the bag, melt the first/bottom color of candy melts. Pour into a baggie and snip a tiny bit of the tip off. Pipe whatever design you want. Do the same in the next color. If you are doing a two tone design, you're done!


Solid sugar/sprinkle design. Mix a little meringue powder with water, one to one ratio. About one tablespoon each should do. Using a food only paint brush, paint on the meringue water, covering the whole top. Set the Oreo on a paper plate and pour the sanding sugar or sprinkles on. Shake the excess off and move on to the next!


Sugar/sprinkle design. Make the above meringue mixture and using your paint brush paint on your desired design. Pour on your sanding sugar or sprinkles. Repeat!


Easy peasy, can go with any decor and looks very impressive. :)

Friday, December 10, 2010

How to Make a Banner


Supplies:
Scrapbook card stock to match your theme
Plain Cardstock in a complementing color
Ribbon (10ft or so)
Photo Squares
Ruler
Scissors
Circle cutter
Pencil
Computer/Printer
Exacto knife


1. Decide how large you want to make your banner. The “Birthday” in mine was about 5’ long. You will have to adjust the squares and circles to make it the appropriate size.
2. I cut the squares 5”x5”.
3. On the computer (I use Microsoft Publisher) choose the font you like and play with it to make it as large as you need and the color you want. If you set the screen at 100% you can hold the squares up to the screen and get a good idea of the size it needs to be. Use the circle button and make it large enough to go around the letter. If you want a dotted circle double click on the circle, click on “dashed” and choose the 2nd option. While the circle is highlighted change it to the color of your choice. Print on a regular sheet of paper to make sure it is the right size. When you have it how you want it copy and paste it (in the computer) for as many letters as you need, changing the letters as needed. Print on card stock.
4. Use your circle cutter or scissors to cut out the circles. This is tiresome!!!!
5. Measure your ribbons width and with a pencil mark on the back of the squares where you will cut the slits for the ribbon. I make a template from extra card stock so I can easily trace it instead of measuring on all of them.
6. Using the exacto knife cut the slits for the ribbon.
7. Attach the circles to the squares with the photo squares. You can use glue but it tends to wrinkle the paper.
8. Thread the ribbon through the papers with the letters in the right order! Tie a bow on each end and tack up :)

Tuesday, December 7, 2010

Bathroom Cabinet Overhaul

Two years ago I reorganized my master bathroom cabinets by adding shelf space and various sized baskets. Since then we have moved our bedroom upstairs and so repurposed the bathroom. Without having clear purpose for the cabinet and with my hair stuff collection growing, the cabinet became a disaster once again.


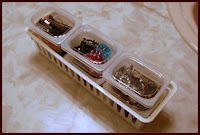
I hate that. Couldn’t deal with it. Had to do something about it. So the first thing I did was to organize my hair stuff. It was a mishmash of everything in a little basket. I wracked my brain for some sort of cheap containers to keep it all separate yet fit in the basket. I came up with using the baby food containers. It worked great! I sorted the hair ties, barrettes, bobby pins, etc into separate containers. Now I could just grab the container I need and not have to wade through it all.


This wasn’t enough. I had our “extras” stored in the cabinet along with other miscellaneous items and they needed organization. This meant I needed drawers of varying sizes. First I measured height, depth, width. Next I went in search of the perfect drawer set. I could not find one that was short enough with different drawer sizes, so I purchased one that was too tall and took off one of the smaller drawers, making it a perfect fit!


Now my extras, cotton balls, q-tips and other miscellaneous fit beautifully in the cabinet. No more disaster!

To improve my hair bob situation I used the top drawer specifically for that stuff. I kept the baby food container but taped the tops to the drawer to keep them from sliding around. The containers sit in the lids so I can grab them out easily. I love my drawer!

Tuesday, October 12, 2010

Fast Fish Dinner

Here is a quick dinner (20 minutes start to finish) that is super easy to make!
Great for all who don't like fish but eat it because it's good for you. You can't taste the fish!

Basil Pesto Fish:
lemon juice
1/2 cup bread crumbs
1/2 cup basil pesto (usually found near the deli, I like Buitoni brand)
4-6 fresh fish fillets, like Tilapia

Biscuits:
Bisquick

Stuffing:
Stove Top

1. Preheat oven to 450°. Put aluminum foil on two pans and spray with a non-stick spray. Mix together pesto and bread crumbs. Rinse fish, then squirt with lemon juice. Place on prepared baking sheet. Spread crumb mixture on top. Bake for 15 minutes.

2. Once fish is in the oven put 2 to 3 cups Bisquick in a bowl and add milk until desired texture. Drop by large spoonfuls onto prepared baking sheet. Bake for 10 minutes.

3. Make the Stove Top. Everything should be done in the 15 minutes it takes to cook the fish. Enjoy!

Tuesday, September 28, 2010

Easy Dinner

Tonight is easy Italian! Chicken Parmesan, Italian biscuits and a vegetable....the easy way.

Chicken Parmesan:
Frozen Breaded Chicken Breast
Favorite Spaghetti Sauce
Mozzarella Cheese

Cook chicken according to directions, taking it out 3 minutes before it is done. Top with sauce and cheese. Bake for 5 more minutes or until cheese is melted.

Biscuits:
Bisquick
1/2 tsp powdered garlic
1/2 tsp dried basil
1/8 cup Parmesan cheese

You can follow the directions on the Bisquick box for 6 biscuits or do what I do...
Use about 2 cups Bisquick and mix in the other 3 ingredients. Add milk until desired consistency. Bake for about 10 minutes.

Make whatever veggie you want to go with it :)

Saturday, September 18, 2010

Tis the Season for Baking....Soon Anyways

The season for baking is coming up fast. Pumpkin, apple, spice, caramel.... I'm getting hungry already! Now is the time to prep your kitchen for baking, specifically your pantry and cabinets. Purge your food of everything out of date or that you know you won't use. Reorganize if you need to so that you can see everything you have, which will save you from buying doubles. Many people don't think about their spices and such, if your spices are old they will loose their flavor. Now is a great time to go through all of them. Check the expiration dates and throw out the old ones. Also check to see if they are still "shakeable". If you have to knock the jar repeatedly against the counter to get it back to normal, throw it out. Don't forget to throw out your baking soda and check the baking powder. It's very important in baking that these are fresh, otherwise you can end up with flat cakes and cookies. Now you will be ready to take advantage of the coupons and sales that will be starting on baking items.

Tip: While purging cabinets and pantry, pull everything out and if needed replace shelf paper; then put everything back in as you throw out and reorganize.

Tuesday, September 14, 2010

Track Your Money

If you find your money seems to disappear and you have no clue where it went, if you know you should have more than you seem to, or if you feel your spending is out of control, then I have a solution for you. The best way to "find" your "lost" money, get a grip on spending or simply to help you keep on budget is to keep track of every cent spent. This seems super overwhelming and once was for me. I would collect my receipts and total them up every other week, I was supposed to anyways but that ends up being ALOT of receipts sometimes. I recently found a better way.

First, go to
http://www.spendingdiary.com/ and create your free account. It is very simple to use and keeps track of it all for you!

Next, make sure you get receipts for EVERYTHING you purchase: coffee, gas, candy bars, groceries, etc.

Most importantly enter your purchases into your spending diary. Using regular, generic Categories will help you see what you spend over all in a category. Use specific Names to see where you are specifically spending. You can then look over the day, week or month and see how and where you've spent your money. You can print out your monthly report to keep for later records.

Here is what I've done to make entering the receipts less overwhelming. When I get home and empty my bags or pockets I put all receipts directly on the computer. This way when I get on the computer next I have only a few and enter them right away, first thing. Doing this I've been able to keep on top of all our receipts and spending!

Thursday, September 9, 2010

Helpful Hint

If you (or you child) has sensitive skin that reacts badly to band aids or other sticky products, here is a trick I've recently learned.

Before you apply the adhesive take a cotton ball soaked in Milk of Magnesia and cover the are that the band aid will be on. Let dry well then apply the adhesive. Very often this will stop any negative reaction. If you do not allow it to dry thoroughly you will end up with a sticky mess when you remove it.

My son was reacting badly to his eye patch until his doctor told us about this trick. Now he does great with it!

Friday, September 3, 2010

Works Like Magic!

Here is an easy trick for removing the wax from a candle jar.

1. Put the candle in the freezer for at least 20 minutes, longer if it’s a large candle (if you forget and leave it in for a few days oh well!)
2. When the wax is frozen take a sharp knife and easily stab it into the wax. Sometimes it pops right out, other times you have to stab it repeatedly (the one in the picture took 2 stabs).
3. To get out any thin wax around the edges immediately put the still cold jar under a stream of cold water. Turn the tap to hot, as the water heats the wax will peel off. Remove the wax and throw away.
4. Use an old scrubby sponge to wash the jar with hot water and dish soap.
5. Voila! Clean candle jar! Now, what to do with it…..?


Here are a few things you can do with empty candle holders.

A. Buy votives to reuse with original purpose. This is much cheaper than buying whole new candles.
B. I use a large one as a utensil holder and love it!
C. I also use one by my bedside to hold nail file, chap stick, etc.
D. Q-tip/Cotton holder.
E. Collect coins from the washing machine.
F. The ones with lids make good button or candy jars.
G. Febreze are a great size for juice cups.
H. Sell at a yard sale :)

Thursday, August 26, 2010

Easy Mint-Chocolate Bars


Bars

1 bag (1 lb 1.5oz) Betty Crocker chocolate chip cookie mix
1/3 cup vegetable oil
2 Tbsp water
1 egg
1 dark candy bar (I like Ghirardelli)

Frosting

3 cups powdered sugar
1 pkg (3oz) cream cheese, softened
¼ cup butter, softened
2 Tbsp milk
¼ tsp mint extract
3 to 4 drops green food coloring

Glaze
1oz semisweet baking chocolate (or substitute some chocolate chips)
1 Tbsp butter

1. Heat oven to 350 degrees. Spray bottom of 13x9-inch pan.

2. In a large bowl, stir all BAR ingredients until well mixed. Melt chocolate bar in microwave for 30 seconds. Stir until smooth, add to cookie dough. Stir until chocolate is evenly through. Press into pan; bake 15-20 minutes. Cool about 10 minutes.

3. In large bowl, mix cream cheese and butter till smooth. Add powdered sugar, mix until smooth. Add rest of FROSTING ingredients, mix until smooth. Spread over bars.

4. In small bowl, microwave GLAZE ingredients for 30 seconds; stir until smooth. Drizzle over frosting. Refrigerate 30 minutes or until set. Cut into bars. Serve cold. Store covered in refrigerator.

*modified Betty Crocker recipe


I made these bite sized by cutting them into 2x1 1/2 inch pieces.

Monday, August 23, 2010

Beauty is in the Eye of the Beholder


I am re-decorating my bedroom and as usual prefer to do it at the lowest cost. This typically means do-it-yourself. For me a mirror is a must over a long dresser but I HATE mirror prices. I mentioned to a few people to keep an eye out at thrift stores or yard sales for me and it just so happens someone had one they were getting rid of! So I had a nice large mirror for free; unfortunately it wasn’t my style and was hung the wrong way. Here is how I “fixed” it.


What I used: a few strong picture hangers, heavy gauge wire, spray paint, dark gold rub, and wall rub-on.

First (if it is rigged to hang the way you don’t want it) lay the mirror upside down on carpet or cardboard. Remove the old hardware and wire. If it is in good condition reuse it, if not buy new and attach it with screws.

Next, flip it back over, lightly sand the frame, then thoroughly clean it. Tape off the edges and then tape news paper to cover the mirror.

You are now ready to spray paint it. Use whatever color goes with your décor. I chose a bronze to compliment other bronze highlights in the room. Make sure the spray paint is appropriate for the material the frame is made of. Flip the mirror back side up once again and spray several light coats, allowing each coat to dry in between. It’s best to wait over night to do the other side but you can after a few hours if you must. Repeat on the front side until it is covered.

I wanted a slightly antique more dimensional feel to the frame so I bought dark gold rub (in paint section of craft store) and rubbed it lightly over the highlighted areas.

For a final flourish I used a rub-on wall decal that said “Beauty is in the Eye of the Beholder” and put it in the corner, following the directions that came with it.

The finished product!


Wednesday, August 18, 2010

Chicken Broccoli Skillet

This is a yummy, healthy, quick dinner. I found the recipie in a cooking magazine and changed it up a bit. You can put it over egg noodles, rice or mashed potatos. Feeds 4. Takes about 25 minutes total.

1-1/2 lb boneless, skinless chicken breast, cubed
2 cups frozen cut broccoli, thawed
1 cup shredded or cut carrots
1/2 cup chopped onion
1 Tbsp. olive oil
1 can (10-3/4oz.) condensed cream of broccoli soup, undiluted
1 cup milk
1/8 tsp. pepper
1 cup shredded colby cheese

1. While making the recipe, cook mashed potatos, rice or eggs noodles to go with the chicken and broccoli skillet.

2. In a large skillet, saute onion in oil for a minute or two then add chicken, broccoli and carrots. Saute for 5-6 minutes or until chicken is no longer pink.

3. Stir in the soup, milk and pepper. Cook, uncovered, over medium heat for 8-10 minutes or until heated through. Sprinkle with cheese. Remove from heat; cover and let stand until cheese is melted. Serve over desired dish. Goes well with biscuits.