Wow your family and friends by dressing up some White Chocolate Covered Oreos (WCCO). You'll have to excuse my poor quality pictures. I don't have the time to dress them up :)
You need any of the following you want.
Candy melts in desired color (found in craft stores or Wal Mart)
Meringue Powder (found in craft stores or Wal Mart)
Food only paint brush
Decorating sugar or sprinkles
Candy Melt design. Following directions on the bag, melt the first/bottom color of candy melts. Pour into a baggie and snip a tiny bit of the tip off. Pipe whatever design you want. Do the same in the next color. If you are doing a two tone design, you're done!
Solid sugar/sprinkle design. Mix a little meringue powder with water, one to one ratio. About one tablespoon each should do. Using a food only paint brush, paint on the meringue water, covering the whole top. Set the Oreo on a paper plate and pour the sanding sugar or sprinkles on. Shake the excess off and move on to the next!
Sugar/sprinkle design. Make the above meringue mixture and using your paint brush paint on your desired design. Pour on your sanding sugar or sprinkles. Repeat!
Easy peasy, can go with any decor and looks very impressive. :)
Monday, December 20, 2010
Friday, December 10, 2010
How to Make a Banner
Supplies:
Scrapbook card stock to match your theme
Plain Cardstock in a complementing color
Ribbon (10ft or so)
Photo Squares
Ruler
Scissors
Circle cutter
Pencil
Computer/Printer
Exacto knife
1. Decide how large you want to make your banner. The “Birthday” in mine was about 5’ long. You will have to adjust the squares and circles to make it the appropriate size.
2. I cut the squares 5”x5”.
3. On the computer (I use Microsoft Publisher) choose the font you like and play with it to make it as large as you need and the color you want. If you set the screen at 100% you can hold the squares up to the screen and get a good idea of the size it needs to be. Use the circle button and make it large enough to go around the letter. If you want a dotted circle double click on the circle, click on “dashed” and choose the 2nd option. While the circle is highlighted change it to the color of your choice. Print on a regular sheet of paper to make sure it is the right size. When you have it how you want it copy and paste it (in the computer) for as many letters as you need, changing the letters as needed. Print on card stock.
4. Use your circle cutter or scissors to cut out the circles. This is tiresome!!!!
5. Measure your ribbons width and with a pencil mark on the back of the squares where you will cut the slits for the ribbon. I make a template from extra card stock so I can easily trace it instead of measuring on all of them.
6. Using the exacto knife cut the slits for the ribbon.
7. Attach the circles to the squares with the photo squares. You can use glue but it tends to wrinkle the paper.
8. Thread the ribbon through the papers with the letters in the right order! Tie a bow on each end and tack up :)
Tuesday, December 7, 2010
Bathroom Cabinet Overhaul
Two years ago I reorganized my master bathroom cabinets by adding shelf space and various sized baskets. Since then we have moved our bedroom upstairs and so repurposed the bathroom. Without having clear purpose for the cabinet and with my hair stuff collection growing, the cabinet became a disaster once again.
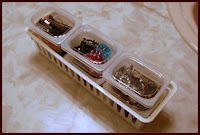
I hate that. Couldn’t deal with it. Had to do something about it. So the first thing I did was to organize my hair stuff. It was a mishmash of everything in a little basket. I wracked my brain for some sort of cheap containers to keep it all separate yet fit in the basket. I came up with using the baby food containers. It worked great! I sorted the hair ties, barrettes, bobby pins, etc into separate containers. Now I could just grab the container I need and not have to wade through it all.
This wasn’t enough. I had our “extras” stored in the cabinet along with other miscellaneous items and they needed organization. This meant I needed drawers of varying sizes. First I measured height, depth, width. Next I went in search of the perfect drawer set. I could not find one that was short enough with different drawer sizes, so I purchased one that was too tall and took off one of the smaller drawers, making it a perfect fit!
Now my extras, cotton balls, q-tips and other miscellaneous fit beautifully in the cabinet. No more disaster!
To improve my hair bob situation I used the top drawer specifically for that stuff. I kept the baby food container but taped the tops to the drawer to keep them from sliding around. The containers sit in the lids so I can grab them out easily. I love my drawer!
Subscribe to:
Posts (Atom)