If you are getting professional Christmas pictures or just want to look good in your regular holiday photos, here are a few suggestions to help.
Hair:
Don't cut your hair or change the style. Keep it natural.
Face and body:
1. Makeup needs to be a little heavier than normal. Avoid anything with sparkles, it could create a white spot that could look like a blemish. Foundation with SPF makes skin look shiney. Mascara should be clump free.
2. Tan lines look very bad in photos and sunburns look worse. Avoid excessive sun or tanning for a week or so before hand. Try to cover any tan lines with your clothing.
3. If you have tattoos you don't want shown, let the photographer know and they can help you hide them.
4. If you have braces don't try to hide them by holding back smiles; in the end it only looks worse. Let yourself smile normally.
5. Don't pull your head back. If you gently pull your chin out and slightly down it is much more flattering.
Clothes:
1. Don't wear stripes or plaid; solids photograph better.
2. Wear clothing that flatters you. If you don't like your arms then don't wear sleeveless tops, etc.
3. If you're wearing light bottoms make sure you are also wearing plain, light underwear. Same with shirts and bras.
4. No bra straps showing please! They are unattractive in real life and worse in pictures. Also make sure the bra doesn't create unsightly lines in your top.
5. Light clothes look better on light backgrounds and dark clothes look better with dark backgrounds.
6. Jewelry should be kept simple, so that you are the focal point and not your necklace.
7. Nail polish: Your toes and nails will show up, so make sure you remember to do them. Avoid bright or dark colors, natural photographs better.
For guys:
1. A clean shave photographs best.
2. If he's wearing a dark outer shirt he needs to wear a grey or dark undershirt. Otherwise the white will stand out.
For Professional Photographs:
Bring your own props and as many as you want. Anything from toys or musical instruments to sports equipment. Whatever can help define you. This is typically done for children, teens or whole families.
For at Home Photography:
Don't be afraid to pose you and your spouse in front of a mirror. Try several ways of standing or sitting to see what best flatters or that feels most natural. This way when there is someone around to take your picture you can pose instead of having that same old sitting or standing side by side look.
Sunday, November 23, 2008
Wednesday, November 19, 2008
Quick clean up
It's about that time...when family and friends all come around and instead of enjoying it we get stressed. If you've deep cleaned your house recently you're in good shape (if not, then I suggest you do a really good cleaning soon, at least a week before company is due). All that you have to do now is clear clutter and quick clean and then you'll be ready for guest. I'll give you tips on the quickest clean (around 15 minutes total) for the biggest bang and then a few more for if you have extra time or help.
Whichever area they see first is where you need to start. This is why I usually get my husband to mow and edge a week or so before a holiday or event(since we live in sunny FL!). I suggest you keep an extra storage tote handy in your garage or a closet that you can use to throw clutter in at the last minute to be dealt with later. It's preferable to keep clutter at a minimum on a daily basis though.
Livingroom: the main thing here is to get rid of clutter and straighten.
Extra time or helpers: sweep or run the vacuum and do a quick dust on the tables or in prominent areas.
Bathroom: put cleaner in the toilet and let it sit while you wipe down the faucets and mirror with paper towels and Windex, then flush the toilet (when the faucets are clean everything else looks better, if everything else is clean and not the faucets the bathroom will still look messy). Clean up any major spots or spills in the sink or on counter. Close the shower curtain.
Extra time or helpers: Scrub the toilet instead of just flushing. Empty the trash. Wipe down the sink, counters, floor and toilet with Windex.
Kitchen: Sweep. Clear clutter. Get all dishes out of sight - put dirty ones in the dish washer (or oven if you won't be cooking!), and clean ones put away. Wipe down sink and faucet and table.
Extra time or helpers: Wipe down all counters, refrigerator, stove and garbage can. Take out trash if it's full.
Bedrooms: Make the bed. Clear clutter.
If working quickly, you should be able to pull off the quickest clean within 15 minutes. If you add in the rest and you're working on your own then it will take about 30 to 40 minutes.
Tip: if you want to make things as easy as possible do a deep clean and then set aside 15 minutes every night. Before going to bed pick up clutter and either put it away or in the room it needs to be in. Straighten the family area and kitchen. Wash and put away any dishes that are remaining. If you have kids get them into the same routine (they can start putting away things as soon as they can pull them out). Before they go to bed every night have them go around and put away all their toys. If you do this every night you will be much less stressed every morning.
Monday, November 17, 2008
Ready for travel?
Getting ready to go away can be very stressful and something is always forgotten. So here's what I've done and hopefully it will help to make sure at least part of your packing goes well.
It only takes me 5 minutes to get my toiletries ready for a trip! Here's how you do it...
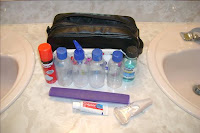
First buy 2 toiletry bags that come with refillable bottles (one for you and one for your husband, more if you have kids). You can usually find these anywhere from $7-$15. You could also dedicate a small bag you have around the house and buy the bottles seperate.
Fill the bottles with your own shampoo, conditioner, body wash and face wash. This saves money and you get to have your favorite products. You can use a Sharpie to mark the bottles so they don't get confused.
I stores those in the bag along with my tooth brush holder, razor holder, tooth paste, mouth wash, small beg with cotton balls and q-tips, etc.
The key is to store all this in the bag so that when you go to pack everything is right there and ready. I suggest you keep them in a bathroom cabinet or with your suitcase, if it's in a cool place. If you refill the bottles when you return, before you pack it back up, then they are ready to go the next time.
Tip: for extra convienience I buy small bath puffs (2 or $1 type)to take along and I throw them away when we leave. This prevents packing up wet stuff and I hate using wash cloths.
Here's one of my bags.
It only takes me 5 minutes to get my toiletries ready for a trip! Here's how you do it...
First buy 2 toiletry bags that come with refillable bottles (one for you and one for your husband, more if you have kids). You can usually find these anywhere from $7-$15. You could also dedicate a small bag you have around the house and buy the bottles seperate.
Fill the bottles with your own shampoo, conditioner, body wash and face wash. This saves money and you get to have your favorite products. You can use a Sharpie to mark the bottles so they don't get confused.
I stores those in the bag along with my tooth brush holder, razor holder, tooth paste, mouth wash, small beg with cotton balls and q-tips, etc.
The key is to store all this in the bag so that when you go to pack everything is right there and ready. I suggest you keep them in a bathroom cabinet or with your suitcase, if it's in a cool place. If you refill the bottles when you return, before you pack it back up, then they are ready to go the next time.
Tip: for extra convienience I buy small bath puffs (2 or $1 type)to take along and I throw them away when we leave. This prevents packing up wet stuff and I hate using wash cloths.
Here's one of my bags.

Thursday, November 13, 2008
Bathroom Cabinet Follow-up

If you'd rather spend some money for a nifty little item, rather than going through the trouble of a shelf, I found a hair care storage system you can purchase online. I have scoured the stores and can't find them anywhere but they do have them on Amazon.com and a few other sites. I'm not sure what to call them exactly because different sites call them differnt things. You can find one by googling "hair dryer holder". They range from about $7 to $15 plus shipping and handling. I really wanted one but I had shelf stuff on hand and my cabinets aren't really conducive to screwing things into the front panel.
Wednesday, November 12, 2008
Bathroom Cabinet Space
Space is a precious thing and bathrooms never seem to have enough of it! It's always wonderful when more can be made. For a few dollars you can almost double the usable space in your bathroom cabinet.
All you need is some scrap lumber and shelf brackets. You can get scrap lumber at your hardware store or a local construction site (YES! Just be sure to ask, they are usually very nice about giving away what they aren't using); make sure it is more than a foot wide. Brackets can be found for as little as .35 cents a piece at WalMart. You'll also need a few self-drilling screws, drill and saw.
First, clear out all the clutter from under the sink. Usually the pipes run to one side or the other, choose the roomiest side for the shelf. In deciding where you will put it factor in the highest item you will store on and under the shelf, so you don't place it too low or too high. Measure the length you need the shelf to be 2 or 3 times.
Next you need to cut the wood (I had my husband do this for me the weekend before). Screw the brackets into the back of the cabinet, then screw the shelf onto the brackets. Easy and inexpensive!
Now go through all the junk you pulled out and get rid of the stuff you don't use. Root through the house for containers to organize what's left. Below are a few pictures with suggestions.
Before

After

I needed space for my hair dryer and straightening iron because they were a tangled mess behind the toilet paper. I took out several of the towels that aren't used and moved them to a linen closet upstairs.
After: I forgot the "Before"!

This was originally my biggest jumbled mess! On the shelf I organized hair goo, sunscreen, lotion, and hair etc in little baskets I found in the garage. The tackle box holds my make up, behind that are Q-tips, cotton balls and femine products. There are two baskets on the left, the front one holds things I use regularly and the one in the back holds extras and stuff I rarely use.
Before

After

This is the guest bath. Again I removed about 1/2 the towels. The cleaning stuff I stuck on the shelf and put shampoos, etc in the basket with kiddo stuff behind it.
Monday, November 10, 2008
Recipe Tip
When making a recipe you need to double or cut in half, go through the ingredients and make the appropriate adjustments and write them down. This prevents adding too much or too little of some of the ingredients!
Beautiful Chocolate Chip Cookies
These are delicious cookies that turn out beautiful every time!
1 cup Crisco, butter flavored
1/4 cup sugar
1 cup brown sugar
1 tsp. baking soda
1 sm. pkg. pudding, french vanilla or white chocolate are favorites
1 tsp. vanilla
2 eggs
2 1/2 cups all-purpose flour
1 pkg. chocolate chips(Hershey brand is best)
1. In large bowl, cream crisco and sugars; beat in eggs; mix in rest of ingredients.
2. Bake at 350 degrees for 7 to 8 minutes. Cool on bake rack.
Tip: these look under done when you need to remove them from the oven.
Friday, November 7, 2008
The Forgotten 2
There are a few more things that can be done to make your home a little more sharp and a little less shabby. Details are the key.
Touch up paint on the walls or furniture. Replace light or power plates if they have paint on them, are yellowed, or won't come clean. It's best not to paint them because they get grimy to easy and grim doesn't come off paint very well.
This is a bit more involved but first impressions are important. I recently spiffed up the front door and around it, it took about 5 hours total. First the door knob needs to be replaced, it's old and scuffed. I don't have the money to do that right now so I bought some bronze spray paint and now it looks great (this only a temporary fix and I don't recomend you plan on it lasting more than a month ot two). For the light near the door I did the same thing. I then put a fresh coat of paint on the door and the trim. Check out the pictures below!


Monday, November 3, 2008
Double Yummy Pumpkin Pie
4oz cream cheese, softened
1 TBS milk
1 TBS sugar
1 cup milk
1 can (15oz) pumpkin
2 pkg vanilla pudding
1 tsp cinnamon
1/2 tsp ginger
1/4 tsp cloves
1 tub (8oz) cool whip
1 graham crust
1. Mix first 3 ingredients in large bowl with wire whisk until well blended. Gently stir in 1/2 cool whip. Spread into crust.
2. Mix next 6 ingredients in a large bowl. Beat with wire whisk until well blended (will be thick). Spread over cream cheese layer.
3. Refrigerate 4 hours or until set. Top with remaining cool whip. Serves 10.
Great alternative to the regular old stuff. Keeps well in refrigerator for a few days.
Saturday, November 1, 2008
Extra Storage
Need a little extra storage in the bathroom? If you have too little counter or cabinet space this idea is great for things you like to have on hand.
You need a hook, length of chain and a basket (an egg basket works best). Simply install the hook into your ceiling; attach the chain as long as you'd like; hook the basket onto the end. It's great for holding brushes and other light items. If you want to put your hair dryer or other heavier things in it, make sure you buy a hook that has an anchor.
Good Luck!
Subscribe to:
Comments (Atom)